Linux Crash Course
Kickoff — the basic concepts, before you need them
Before you start clicking through
This deck is an overview, not the material. The four written parts have the details: worked examples, the exceptions, what breaks and why:
- Part 1 — The command line
- Part 2 — Installing and managing tools
- Part 3 — Git and GitHub
- Part 4 — Files you will meet
You need only Part 1 before a first practical. If you have little time, read Part 1 carefully, and use the rest of this deck as a preview.
Why a terminal at all?
A fair question, before you spend an evening on this.
- Many tools exist only there. Most scientific software has no graphical interface. Another program can run a command-line program a thousand times. It cannot run a program that needs a person to click.
- It is a record. You can copy a command into a methods section, run it again next year, and someone else can check it. You cannot do this with clicks.
- It works the same for many files. The command for one file also works for four hundred files, without changes.
The disadvantage: a terminal does not show what it can do. It shows a cursor and waits. Part 1 teaches you what to type.
Part 1 — The command line
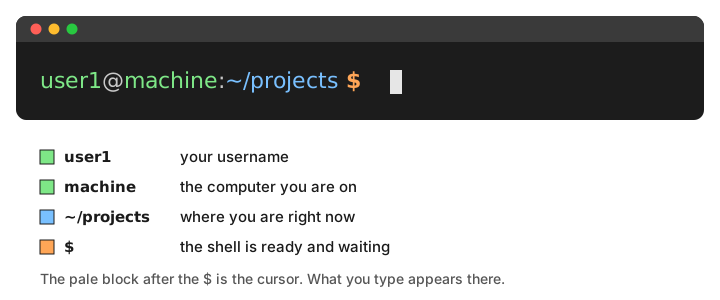
Reading the prompt
Own figure.
The most important part is where you are now. It changes as you move around, and it answers the question that confuses beginners most often.
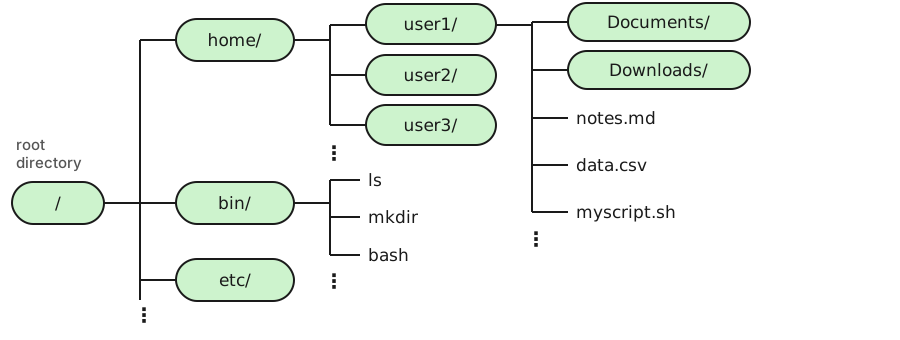
The filesystem is one tree
Own figure.
There are no drive letters. Everything — a second disk, a USB stick, a network drive — is a directory somewhere inside this one tree. And names are case-sensitive: Data.csv and data.csv are two different files.
Moving around
pwd, ls and cd answer where am I? and what is here? Ask these two questions before you do anything else.
Press Tab. Every time, not only when you are stuck.
A file name typed from memory is a guess. A name that the shell completed is not: either it is spelled correctly, or the file does not exist. We repeat this because people forget it most often when they are in a hurry.
Parameters change what a command does
Four parameters, four jobs: -t, the separator, -k2 which column, -n compare as numbers, -r largest first. Without -n, 103 comes before 12, because as text it starts with a smaller character.
Never put a space in a name you create
The shell splits what you type at each space. So it cannot tell a space inside a file name from a space between two arguments.
cd received two arguments, not one. Quotes (cd "lab notebook") fix it, but the real fix is simpler: use lab_notebook, and the problem never occurs. Graphical file managers and Windows allow spaces in names, so you meet this problem for the first time in the terminal.
Pipes: small tools, chained
Read it from left to right, as a sentence: sort, count the repeated lines, then sort that result as numbers. None of these four tools knows about the others. With the pipe, simple tools answer a question that no single program was written for.
Wildcards, briefly
* matches any number of characters. Before you use it with rm, check with ls which files it matches.
Part 1, in one line
Terminal, tree, parameters, pipes, wildcards. The full page → also covers the backslash at the end of a line, stdin/stdout/stderr, how to read error messages, a short section on variables such as $HOME, and a checklist to test yourself.
Part 2 — Installing and managing tools
The problem environments solve
Two projects can need different versions of the same dependency, and the versions may not work together. An environment stops the tools of one project from breaking the tools of another. If the environment is written down in a file, someone else can rebuild it and get the same result.
You do not need to “activate” anything. pixi run uses the tools of this project because you are in the directory of this project.
Part 2, in one line
pixi.toml says what you asked for, and pixi.lock says exactly what you got. Commit both files. The full page → also covers conda and mamba. You will see both in documentation, even if you never install them.
Part 3 — Git and GitHub
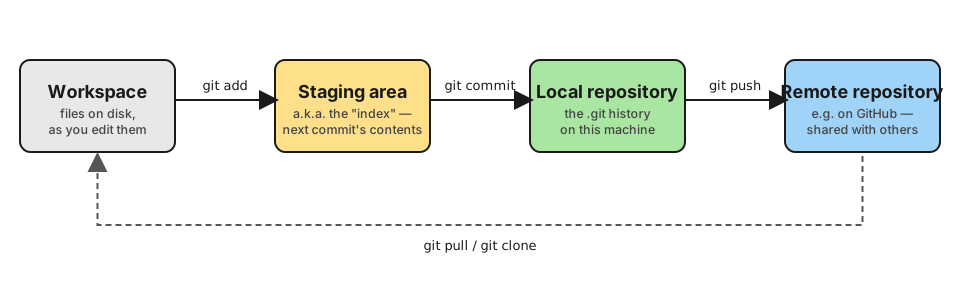
Four stages, one command between each
Own figure.
git config --global user.name "You"          # one-time, per machine
git config --global user.email "[email protected]"

mkdir -p repo && cd repo && git init -q
echo "print('hello')" > analysis.py
git add analysis.py
git commit -q -m "Add the analysis script"
git log --onelineBranches, and the error you will actually see
If a team shares one repository, this happens in the first hour:
Nothing is lost. Git refuses to overwrite someone else’s work with yours. The fix, and a good habit from the start: work on a branch, push it, and open a pull request, so that someone reads your changes before they go into main.
Take care of your GitHub profile
You will need an account. At least one person per team needs one, so that the shared repository can exist. In practice everyone needs one, because each of you pushes your own commits.
See it as more than a requirement. With pinned repositories, a short biography and a clear README for each project, your profile becomes a portfolio. One real example: github.com/jonas-fuchs.
When you apply for a job in this field, your profile can say more than a CV. It shows that you can do the work, instead of only claiming it.
Part 3, in one line
add → commit → push. If other people share the repository, create a branch before you push. The full page → covers diff, restore, merge conflicts, and every step from a branch to a pull request.
Part 4 — Files you will meet
Two formats you cannot avoid
READMEs and GitHub pages are written in Markdown. Tools use JSON to pass structured results to each other: six data types, no comments, no comma after the last item.
Part 4, in one line
Also CSV/TSV, how Excel damages data files without telling you, and the two invisible things that cause errors in text files: line endings and encoding. The full page →
Before your first practical
Getting a terminal, easiest first
Reading the commands is not the same as running them. So first you need a place to type them. Any of these works.
| Nothing to install | webvm.io starts a real Debian Linux in a browser tab. No account, no download. Enough for all of Part 1. |
| On a Mac | You already have one: Applications → Utilities → Terminal. |
| On Windows | Install WSL2: run wsl --install in PowerShell as administrator, then restart. It is a real Ubuntu, and everything here then works for you without changes. |
| The long-term way | Install Linux on your own computer. Nothing here needs it, but everything here is easier with it. |
The browser version forgets everything when you close the tab, and you cannot install software in it. So from Part 2 on, you need one of the other three.
What to do this week
- Get a terminal, in the easiest of the ways above.
- Work through Part 1 carefully. Type the commands, and check yourself against the list at the end.
- Install VS Code, and on Windows its WSL extension.
- Come back to Parts 2–4 when you need them. Nobody expects you to know them in advance.
If your course gives you a prepared machine, you do not need to set anything up. But an hour of typing in a terminal of your own still helps: afterwards, the prepared machine feels familiar and not mysterious.